CC-Excel
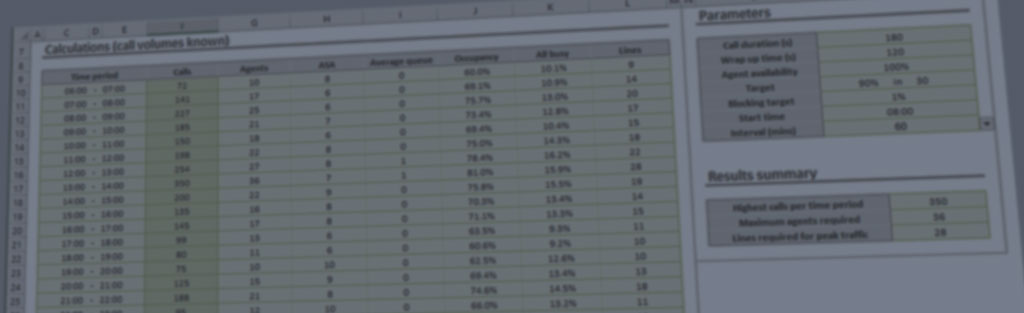
CC-Excel introduces nine Erlang call center functions to Excel for estimating staffing requirements and call handling performance using the Erlang C traffic model. With it, you’ll be able to build your own Excel worksheets, with CC-Excel doing the complicated staffing calculations for you behind-the-scenes.
The CC-Excel functions are contained with an Excel add-in, permanently installed on your computer rather than being transported within workbooks, as is the case with macros. The installer file you downloaded on purchase (iccexcel.exe) should configure Excel for you. You can check this using the self-test utility we install on the Start Menu (CC-Excel | Example workbook).
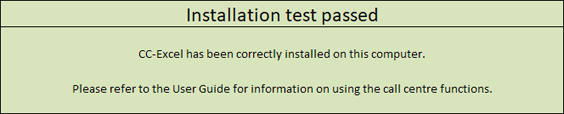
If you see this green box, then CC-Excel installed correctly and is ready to use.
Installation test failed
Occasionally, the installation test will fail and you will see the following output from the self-test utility:

The most common reason for this failure is if you are trying to use the add-in from a different Windows account than the one that installed the software, because Excel’s configuration is stored per-user, not per-machine. We provide a simple applet on the Start Menu to make the necessary changes for the current Windows account. You can access this at: CC-Excel | Re-install CC-Excel.
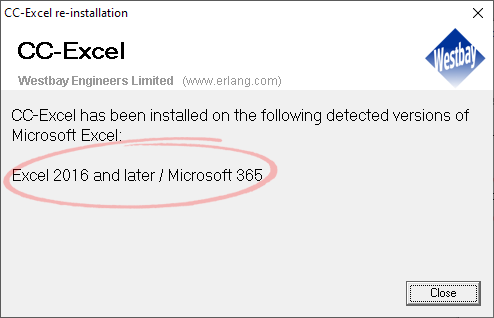
This applet will list the versions of Excel it detects. If your version is Excel is displayed, the configuration should be complete. You can confirm this by running the self-test again (see above) and, if the result is green, you will be able to start using CC-Excel. If the self-test still fails or the wrong version of Excel is detected by the applet, you should try and manually installing the Excel add-in.
Manually installing CC-Excel
If all else fails, follow these steps to manually install the Excel add-in:
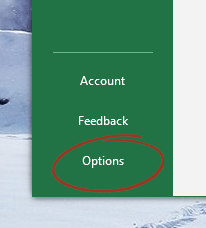
- Open the Excel Options box. The easiest was to reach this is through the File menu. Click it, and a sidebar will appear on the left. Click Options at the bottom of the list:
- On the left menu of the Excel Options box, click Add-ins. At the bottom of the box, select Excel Add-ins from the Manage drop-down box and click Go:

- The Add-in manager will appear. Press the Browse… button:

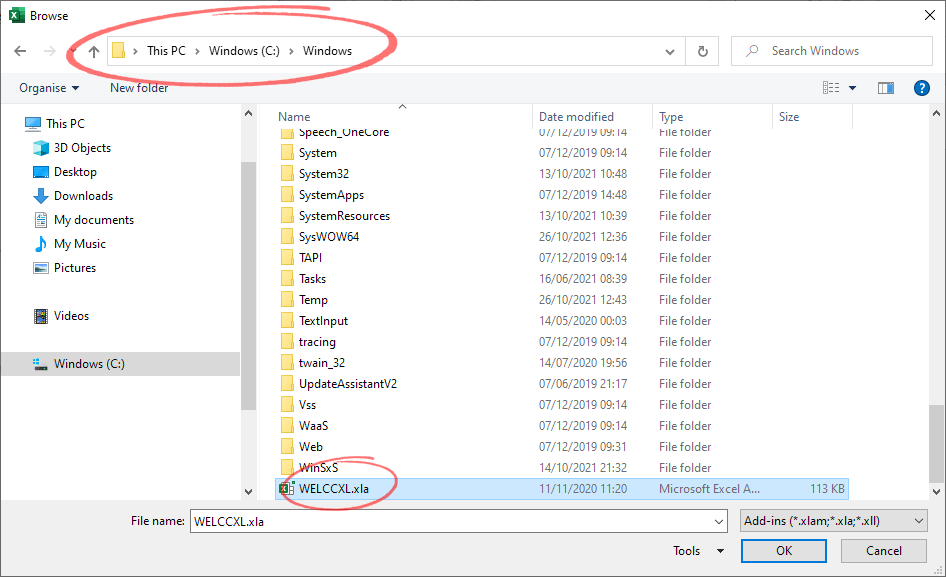
- Using the navigation box, go to the C:\Windows folder and find the add-in file: WELCCXL.xla. Select it and press OK:
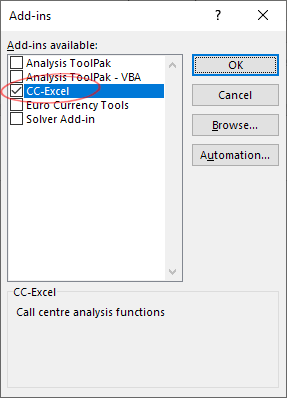
- This should return you to the Add-in manager, with CC-Excel displayed with a tick (check mark) against it:
Press OK, and you will now be back in the main Excel window. Close Excel and restart it. CC-Excel should now be installed and ready to use. You can confirm this using the self-test utility described at the top of this page.
Additional licences
Please ensure that you are licensed to use CC-Excel. If you are not licensed and have not gone through the normal installation and activation process, the manual installation described on this page will not work.
CC-Excel costs $99 for an installation on a single computer. We also offer enterprise licences for multiple installations. This is a once-only payment and includes free upgrades for the lifetime of the product.